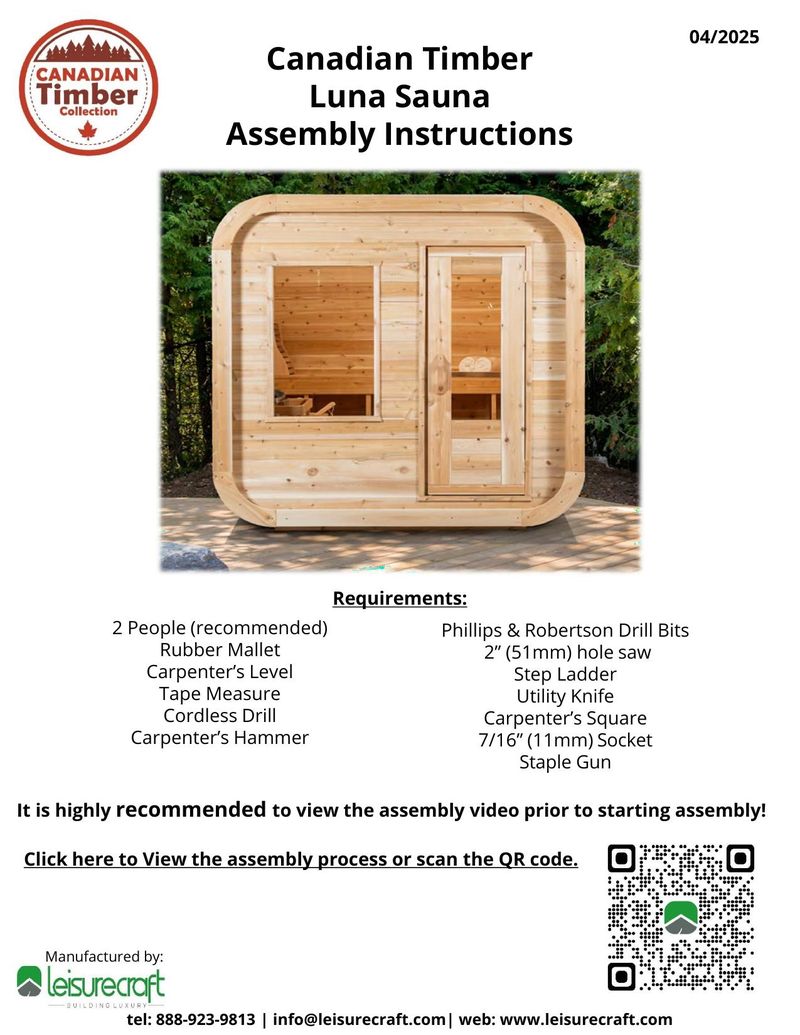
04/2025
Requirements:
2 People (recommended)
Rubber Mallet
Carpenter's Level
Tape Measure
Cordless Drill
Carpenter's Hammer
Phillips & Robertson Drill Bits
2" (51mm) hole saw
Step Ladder
Utility Knife
Carpenter's Square
7/16" (11mm) Socket
Staple Gun
It is highly recommended to view the assembly video prior to starting assembly!
Click here to View the assembly process or scan the QR code.
Manufactured by:
tel: 888-923-9813 | [email protected] | web: www.leisurecraft.com
| Part # | Description | Quantity |
|---|---|---|
| 601010 | 2 x 4 x 83" Standard Staves | 100 |
| 601011 | 2 x 4 x 83" Bottom Stave (4") | 1 |
| 601012 | 2 x 4 x 83" Top Stave (3 1/4") | 1 |
| 603006 | 2"x6"x 81" Back Wall T&G Staves | 12 |
| 603007 | 2"x6"x 81" Wall T&G Staves With Radius for Top | 2 |
| 603008 | 2"x6"x 81" T&G Staves for Bottom of Walls w/ Radius on ends. | 2 |
| 603009 | 2"x6"x 81" T&G Staves w/ Radius on ends (2nd Stave from T/B) | 3 |
| 603010 | 2 x 6 x 45 ½" Window Side Front Wall | 4 |
| 603011 | 2 x 6 x 45 ½" Window Side Front Wall w/ Radius on 1 End | 1 |
| 603012 | 2 x 6 x 10" Short Front Wall | 28 |
| 603013 | 2 x 6 x 10" Short Front Wall with Radius on 1 End | 1 |
| 603014 | 26 ½" x42-1/4" Window in Frame | 1 |
| 602201 | Corner Trim for Luna Sauna | 8 |
| 602202 | Trim Pieces (59") | 8 |
| 602203 | 83 1/8" Bevel Siding | 36 |
| 206000 | Bevel Spacer Block (For Assembly) | 2 |
| 602204 | Floor Joists 60" Long | 5 |
| 604201 | 23 ½" Wide x 79 1/4" Long Pre-Assembled Bench | 2 |
| 604202 | 2 Tier Bench Supports | 4 |
| 205007 | 87" EPDM Rubber | 1 |
| 602205 | 82" Threaded Rods (208cm) | 5 |
| 603020 | Outside Sauna Door Handle (Small) - White Cedar | 1 |
| 603021 | Inside Sauna Door Handle (Large) - White Cedar | 1 |
| 603022 | Single Towel Hook - White Cedar | 1 |
| VENT1 | Sauna Vent (Includes 2 Grills and Inside Slider | 1 |
| LUHARDWARE | Luna Sauna Hardware Package | 1 |
| CT22LUMANUAL | CT Luna Owners Manual | 1 |
| 603004 | 2 Meter Sauna Door with Frame & Hinges | 1 |
Optional Heater
Electric Heater
Manufactured by:
tel: 888-923-9813 | [email protected] | web: www.leisurecraft.com
Parts List
Base Preparation
Sauna Assembly
Bench Installation
Electric Heater Installation (Option)
Care &Maintenance
Warranty

Manufactured by:
tel: 888-923-9813 | [email protected] | web: www.leisurecraft.com
Please read this entire manual before proceeding with the assembly.
Some details between this installation manual and the video may not be exactly same as Leisurecraft is continually trying to improve the quality of our products and ease of assembly. Please refer to this installation manual for the latest version.
Always ensure that you have the correct screw length so that there will be enough thread to hold, and especially, so that the screw does not go all the way through the material and come out the other side.
Every attempt has been made to make the installation information as clear as possible.
All electrical connections must be performed by a qualified licenced electrician!
For further information on your heater and installation instructions, please refer to the provided heater manual.
Thank you for choosing Leisurecraft!

Manufactured by:
tel: 888-923-9813 | [email protected] | web: www.leisurecraft.com
Make sure the base for your sauna is level with a slight slope to the back for drainage. A solid base for your sauna is recommended and can be made from any of:

It is recommended to build a base larger than required to provide a sitting area for cooling off during your sauna session.
Lay out the 5 floor joists.
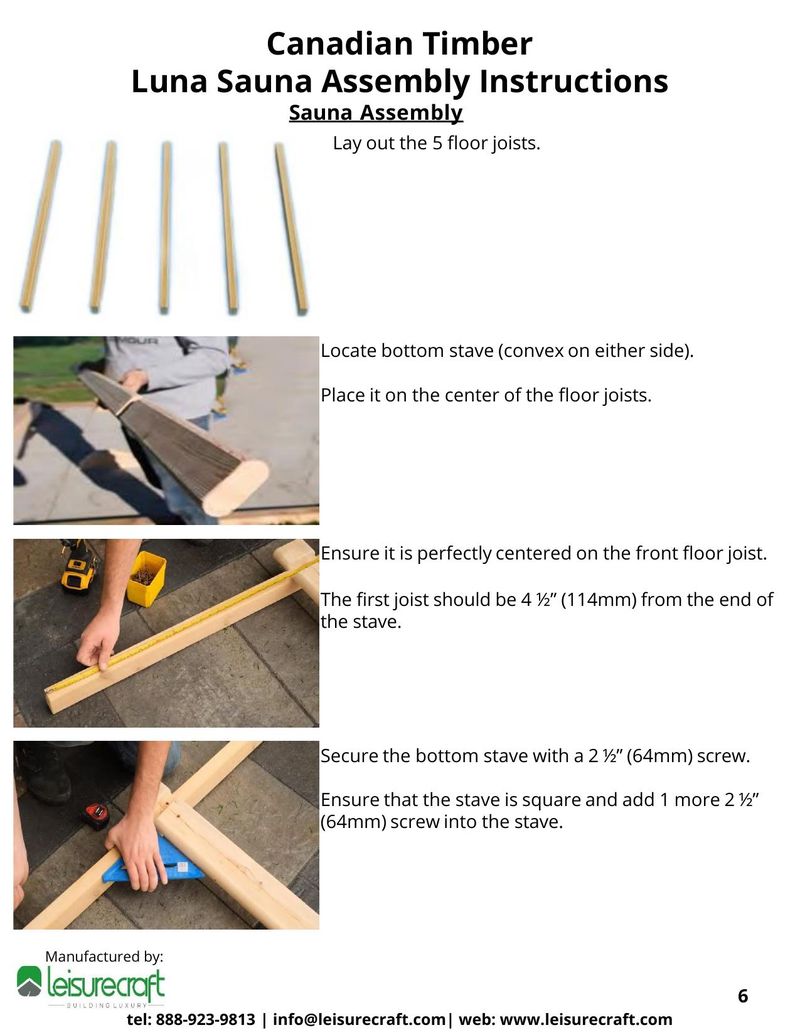
Locate bottom stave (convex on either side).
Place it on the center of the floor joists.
Ensure it is perfectly centered on the front floor joist.
The first joist should be 4 ½" (114mm) from the end of the stave.
Secure the bottom stave with a 2 ½" (64mm) screw.
Ensure that the stave is square and add 1 more 2 ½" (64mm) screw into the stave.
Repeat this process on the other end of the stave.
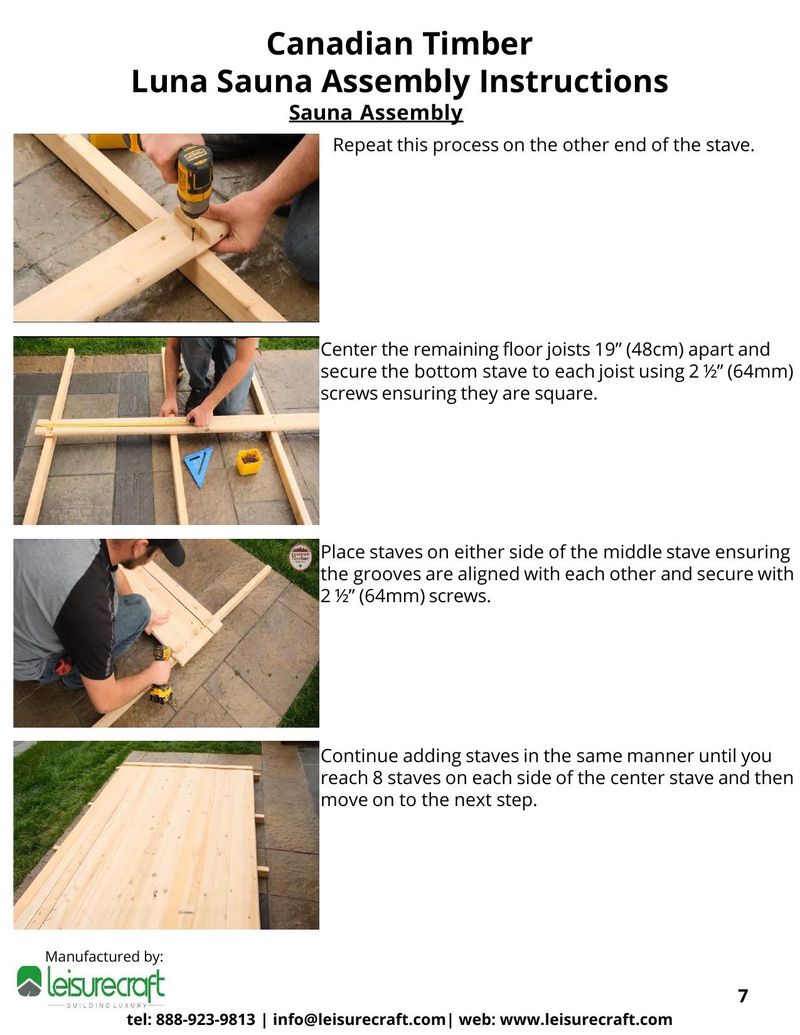
Center the remaining floor joists 19" (48cm) apart and secure the bottom stave to each joist using 2 ½" (64mm) screws ensuring they are square.
Place staves on either side of the middle stave ensuring the grooves are aligned with each other and secure with 2 ½" (64mm) screws.
Continue adding staves in the same manner until you reach 8 staves on each side of the center stave and then move on to the next step.
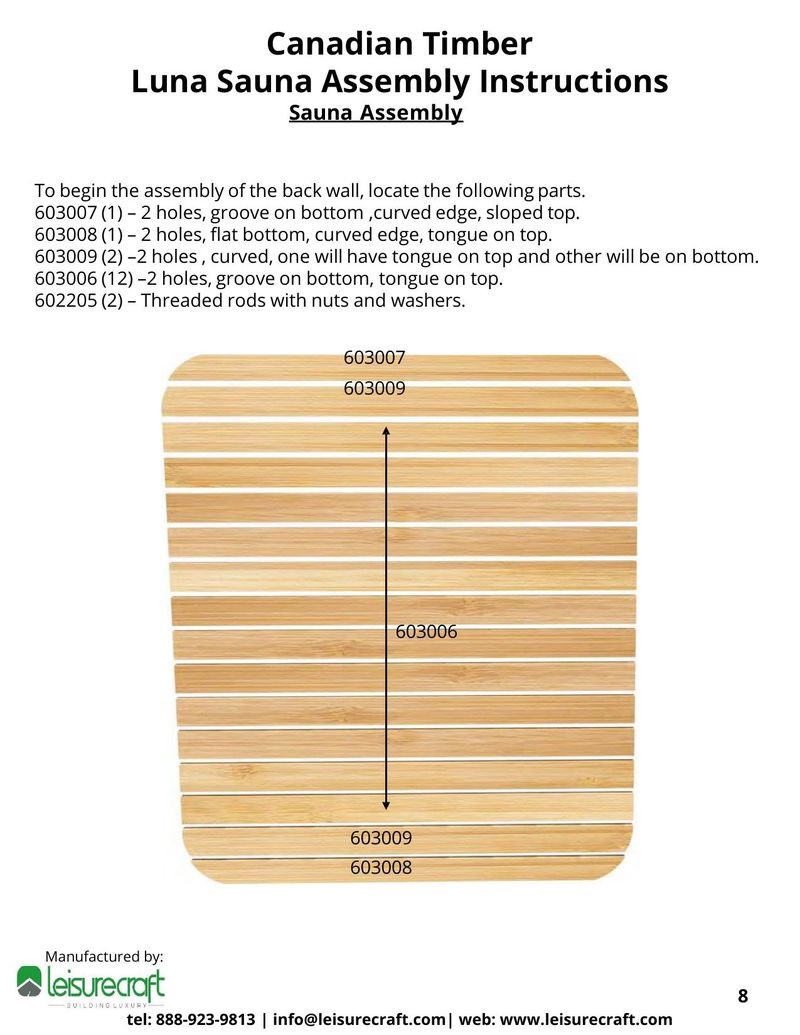
To begin the assembly of the back wall, locate the following parts.
603007 (1) – 2 holes, groove on bottom ,curved edge, sloped top.
603008 (1) – 2 holes, flat bottom, curved edge, tongue on top.
603009 (2) –2 holes , curved, one will have tongue on top and other will be on bottom.
603006 (12) –2 holes, groove on bottom, tongue on top.
602205 (2) – Threaded rods with nuts and washers.
To start assembly of the back wall, lay out the rear wall bottom stave.
(2 holes, flat bottom, curves on ends & the tongue on top)
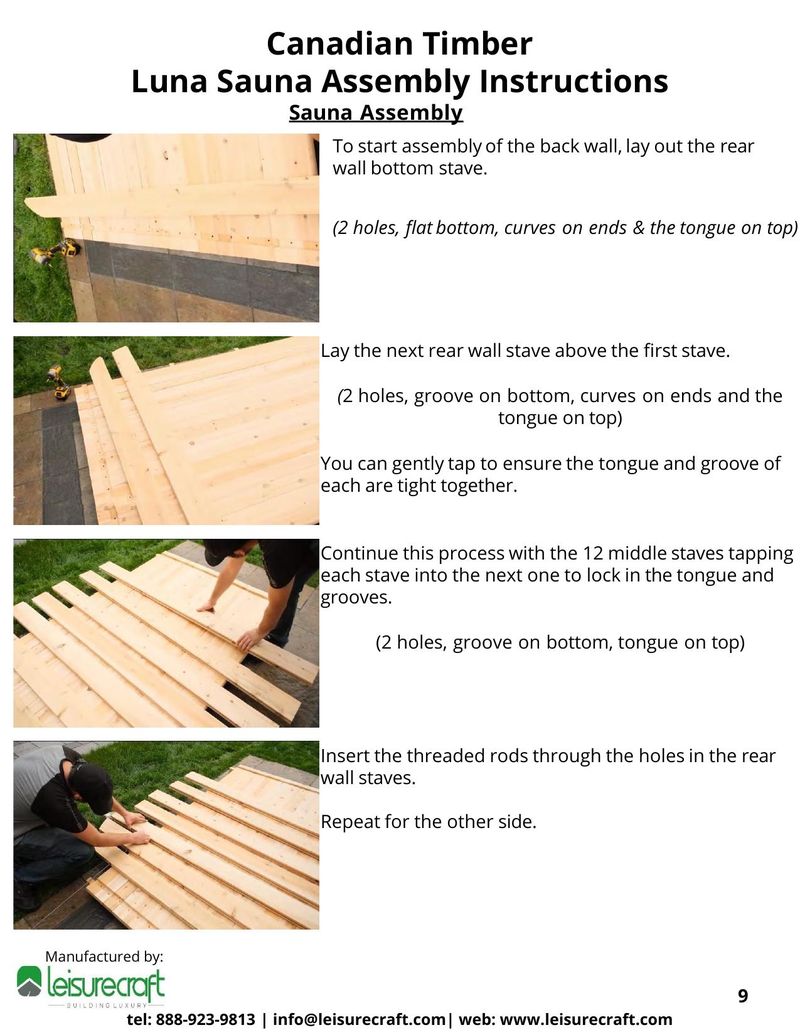
Lay the next rear wall stave above the first stave.
(2 holes, groove on bottom, curves on ends and the tongue on top)
You can gently tap to ensure the tongue and groove of each are tight together.
Continue this process with the 12 middle staves tapping each stave into the next one to lock in the tongue and grooves.
(2 holes, groove on bottom, tongue on top)
Insert the threaded rods through the holes in the rear wall staves.
Repeat for the other side.
Place a washer and a nut on the bottom of the threaded rod and tap them up into the stave.
Repeat for the other side.
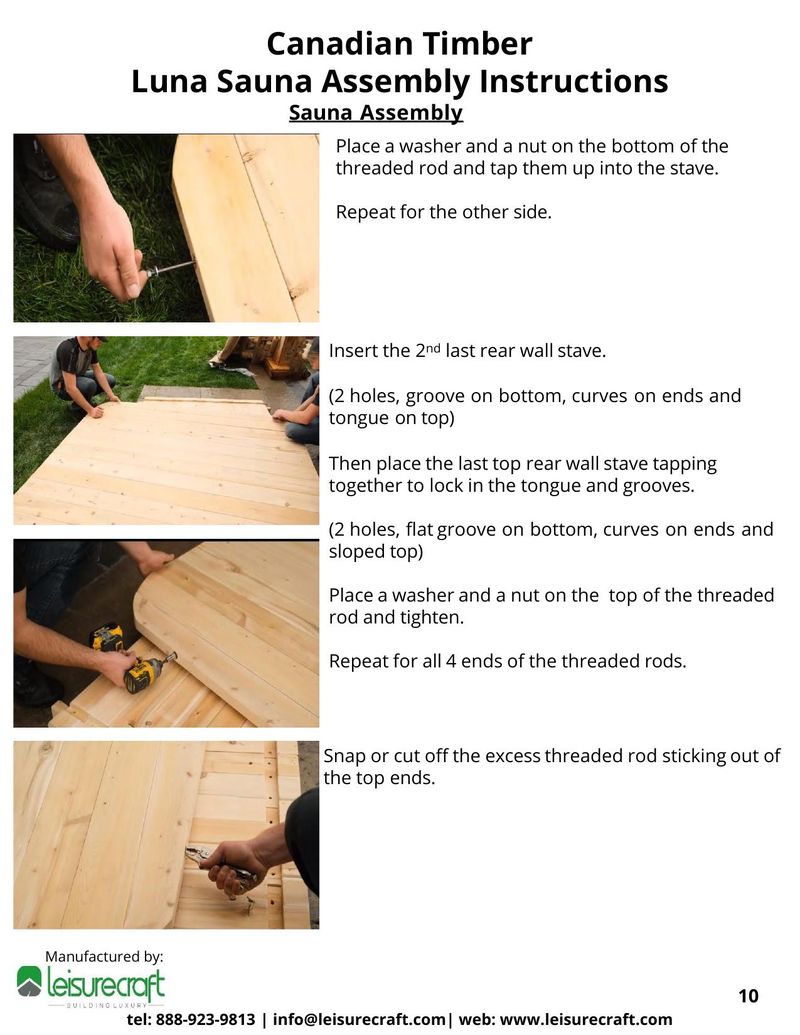
Insert the 2nd last rear wall stave.
(2 holes, groove on bottom, curves on ends and tongue on top)
Then place the last top rear wall stave tapping together to lock in the tongue and grooves.
(2 holes, flat groove on bottom, curves on ends and sloped top)
Place a washer and a nut on the top of the threaded rod and tighten.
Repeat for all 4 ends of the threaded rods.
Snap or cut off the excess threaded rod sticking out of the top ends.
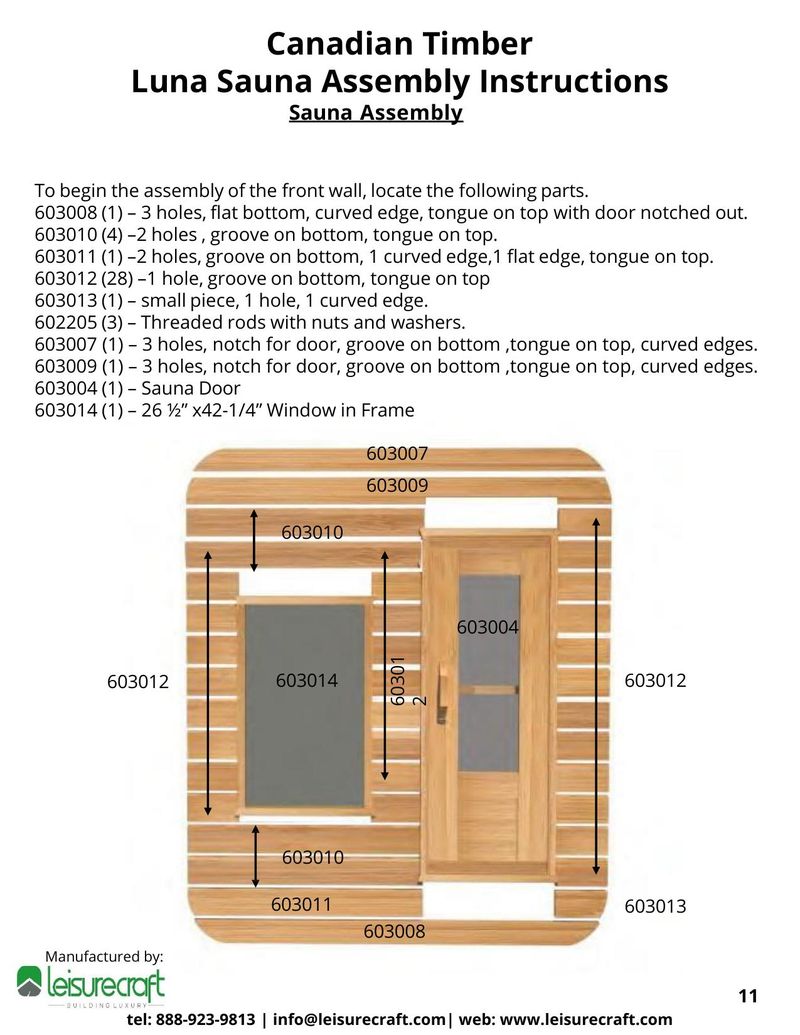
To begin the assembly of the front wall, locate the following parts.
603008 (1) – 3 holes, flat bottom, curved edge, tongue on top with door notched out.
603010 (4) –2 holes , groove on bottom, tongue on top.
603011 (1) –2 holes, groove on bottom, 1 curved edge,1 flat edge, tongue on top.
603012 (28) –1 hole, groove on bottom, tongue on top
603013 (1) – small piece, 1 hole, 1 curved edge.
602205 (3) – Threaded rods with nuts and washers.
603007 (1) – 3 holes, notch for door, groove on bottom ,tongue on top, curved edges.
603009 (1) – 3 holes, notch for door, groove on bottom ,tongue on top, curved edges.
603004 (1) – Sauna Door
603014 (1) – 26 ½" x42-1/4" Window in Frame
Start the assembly of the front wall by laying out the front wall bottom stave.
(3 holes, flat bottom, curves on ends and tongue on top with door hole notched out)
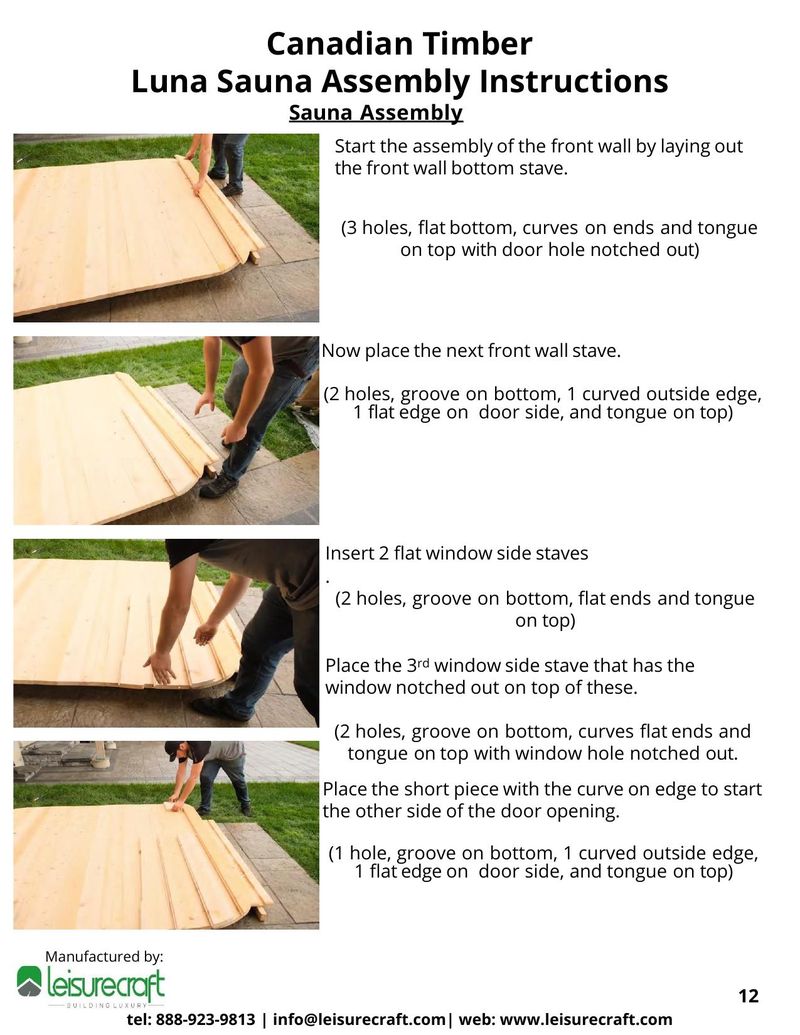
Now place the next front wall stave.
(2 holes, groove on bottom, 1 curved outside edge, 1 flat edge on door side, and tongue on top)
Insert 2 flat window side staves
(2 holes, groove on bottom, flat ends and tongue on top)
Place the 3rd window side stave that has the window notched out on top of these.
(2 holes, groove on bottom, curves flat ends and tongue on top with window hole notched out.
Place the short piece with the curve on edge to start the other side of the door opening.
(1 hole, groove on bottom, 1 curved outside edge, 1 flat edge on door side, and tongue on top)
Place 2 small pieces on top of the last piece.
(1 hole, groove on bottom, 2 flat edges, and tongue on top)
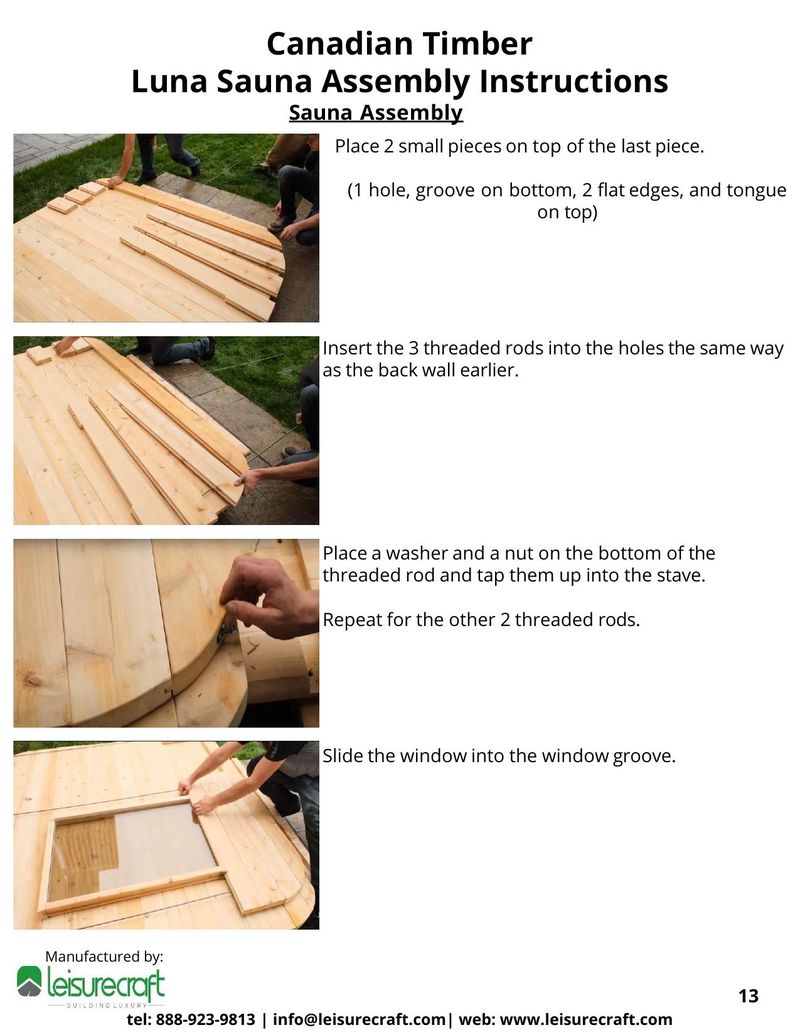
Insert the 3 threaded rods into the holes the same way as the back wall earlier.
Place a washer and a nut on the bottom of the threaded rod and tap them up into the stave.
Repeat for the other 2 threaded rods.
Slide the window into the window groove.
Place the door into the door grove ensuring the logo on the door is at the bottom and on the inside of the sauna and the hinges are facing the outside.
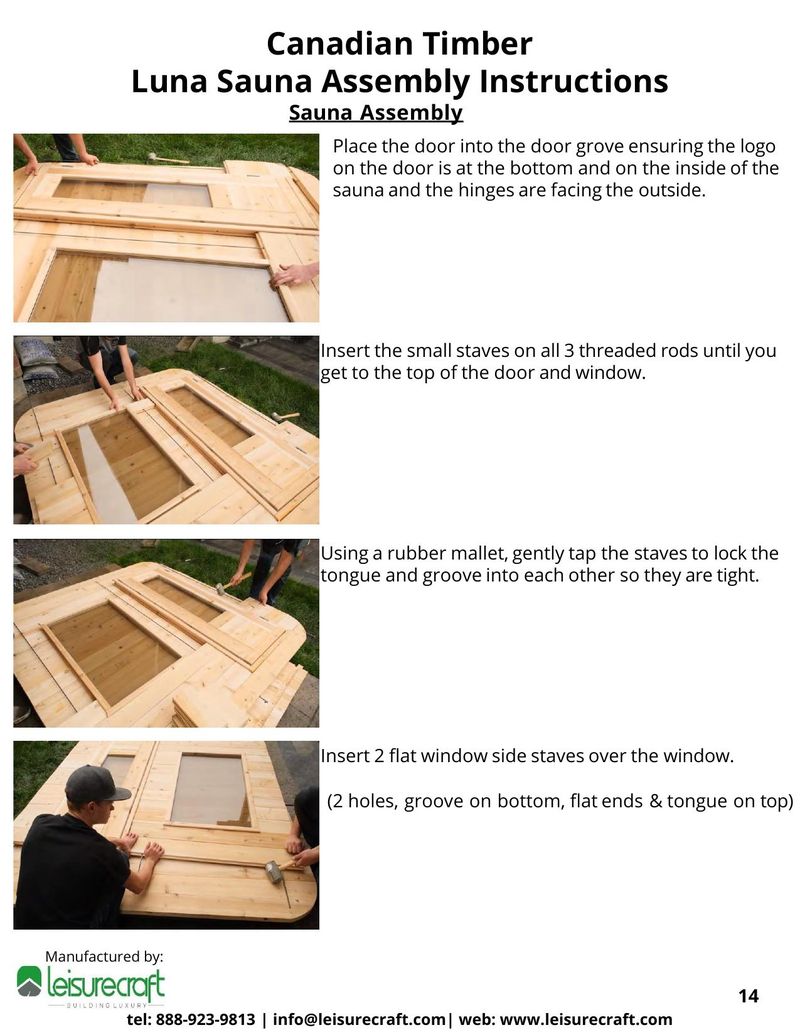
Insert the small staves on all 3 threaded rods until you get to the top of the door and window.
Using a rubber mallet, gently tap the staves to lock the tongue and groove into each other so they are tight.
Insert 2 flat window side staves over the window.
(2 holes, groove on bottom, flat ends & tongue on top)
Place the full-length stave with the door notch cut in above the last staves.
(3 holes, groove on bottom, curves on ends and tongue on top with door hole notched out)
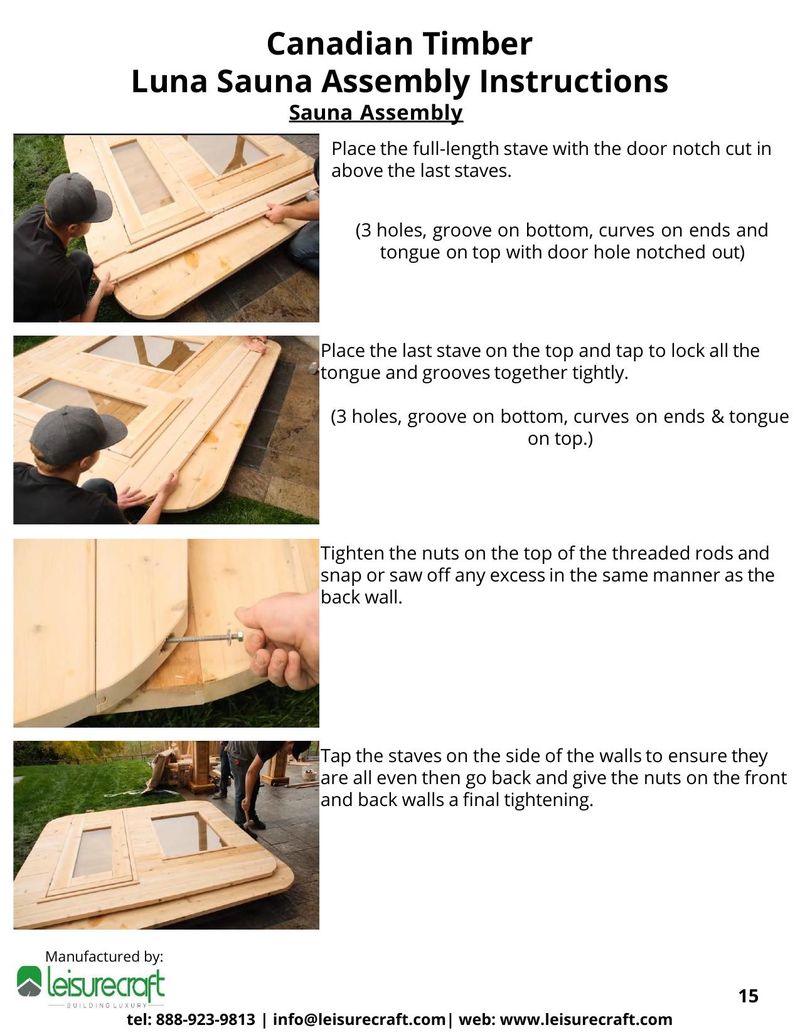
Place the last stave on the top and tap to lock all the tongue and grooves together tightly.
(3 holes, groove on bottom, curves on ends & tongue on top.)
Tighten the nuts on the top of the threaded rods and snap or saw off any excess in the same manner as the back wall.
Tap the staves on the side of the walls to ensure they are all even then go back and give the nuts on the front and back walls a final tightening.
Place the front wall into the grooves on the base of the sauna and ensure it is centered.
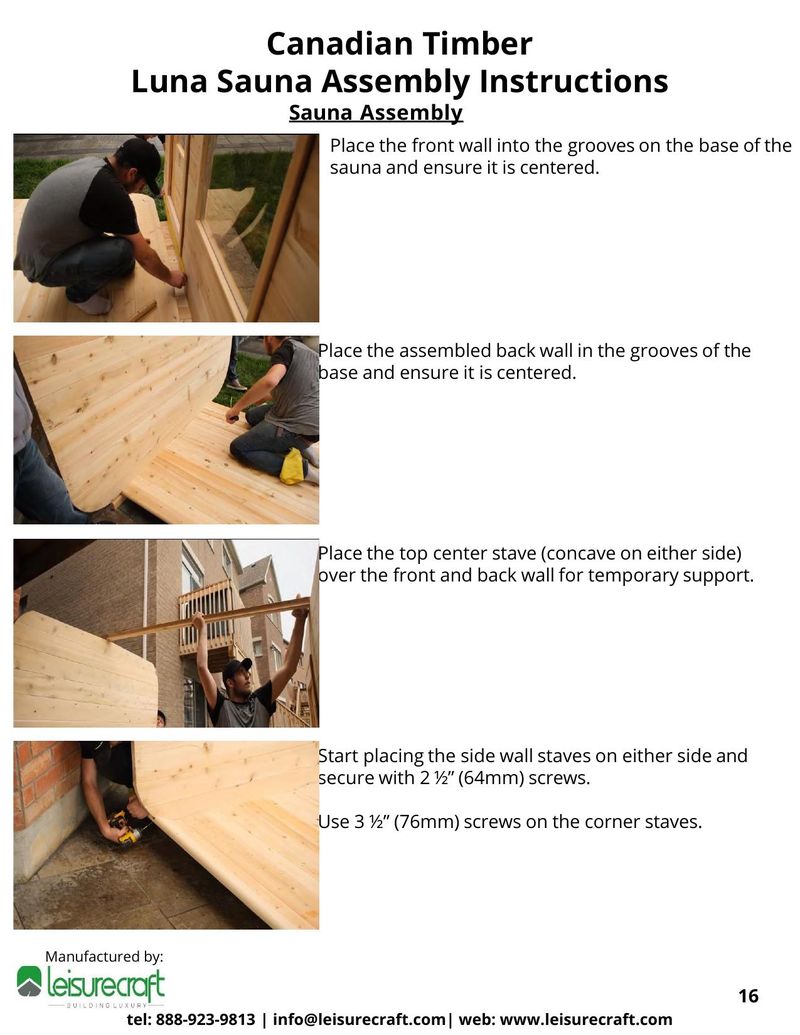
Place the assembled back wall in the grooves of the base and ensure it is centered.
Place the top center stave (concave on either side) over the front and back wall for temporary support.
Start placing the side wall staves on either side and secure with 2 ½" (64mm) screws.
Use 3 ½" (76mm) screws on the corner staves.
Continue adding the side wall staves up both sides of sauna.
Use a rubber mallet to tap staves tight into each other if required.
When you reach the top corners, remove the top stave that was for support and put it aside.
Only place the top staves in at this point, do not screw them down.
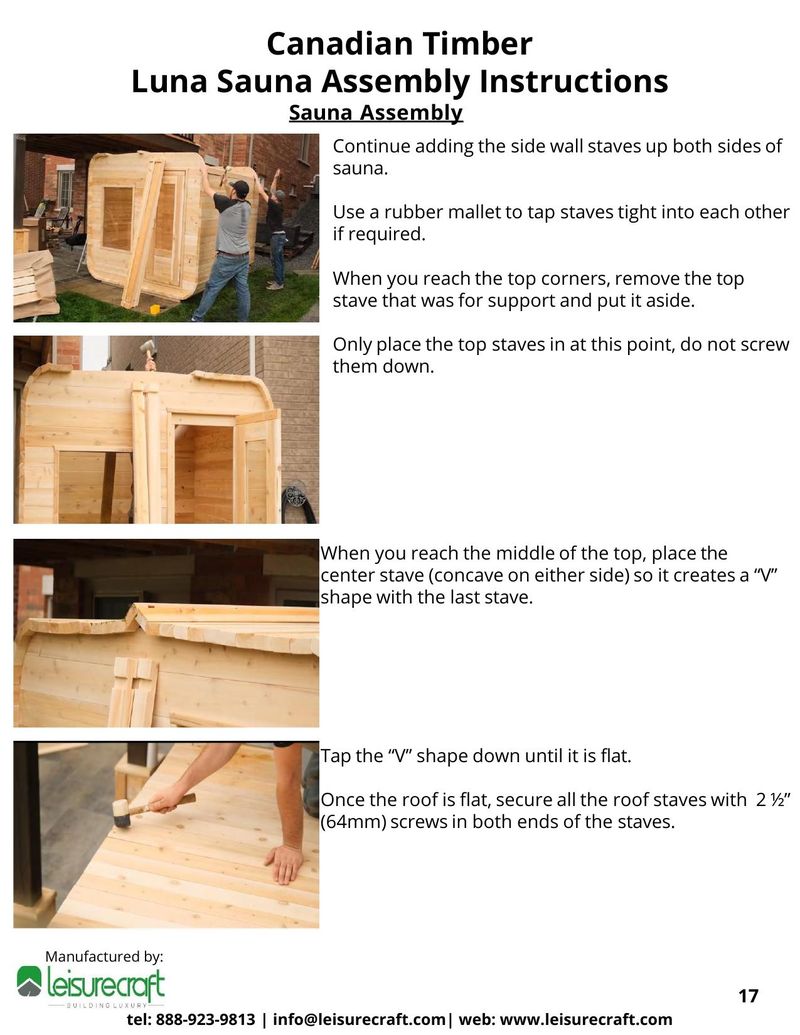
When you reach the middle of the top, place the center stave (concave on either side) so it creates a "V" shape with the last stave.
Tap the "V" shape down until it is flat.
Once the roof is flat, secure all the roof staves with 2 ½" (64mm) screws in both ends of the staves.
Unfold the rubber membrane and place over the top of the sauna.
Ensure that it is centered front to back and side to side.
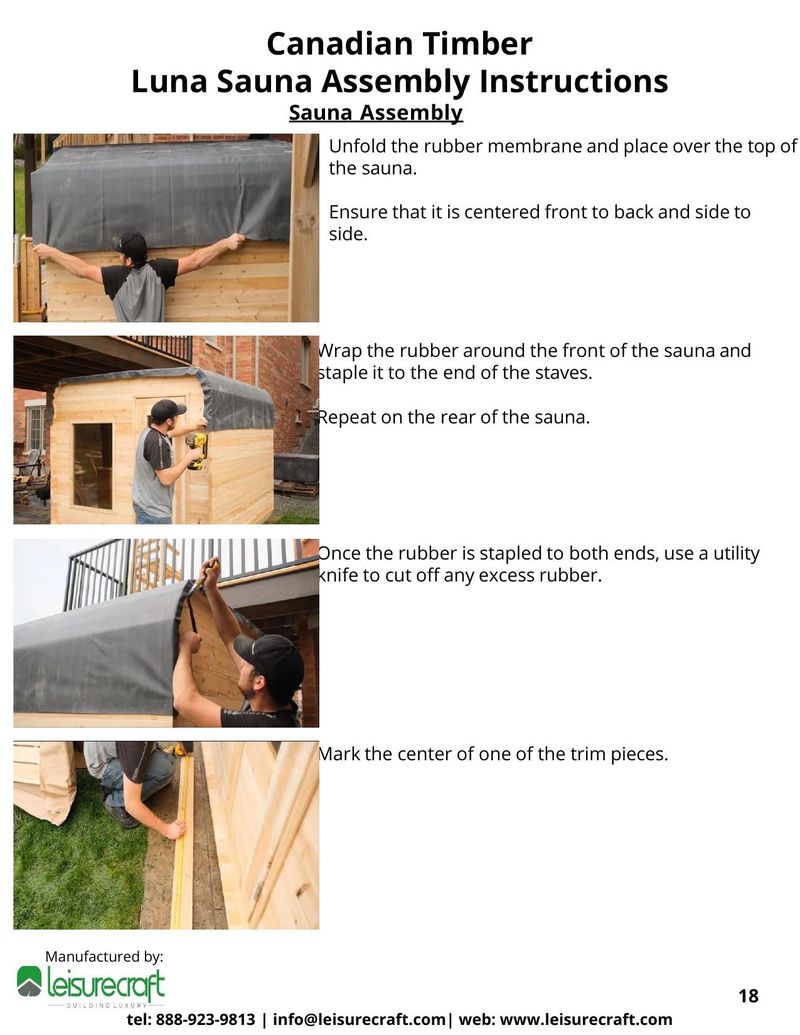
Wrap the rubber around the front of the sauna and staple it to the end of the staves.
Repeat on the rear of the sauna.
Once the rubber is stapled to both ends, use a utility knife to cut off any excess rubber.
Mark the center of one of the trim pieces.
Align this mark with the center of the bottom of the sauna and secure it with 1 ½" (38mm) screws in the middle and on either end of the trim piece.
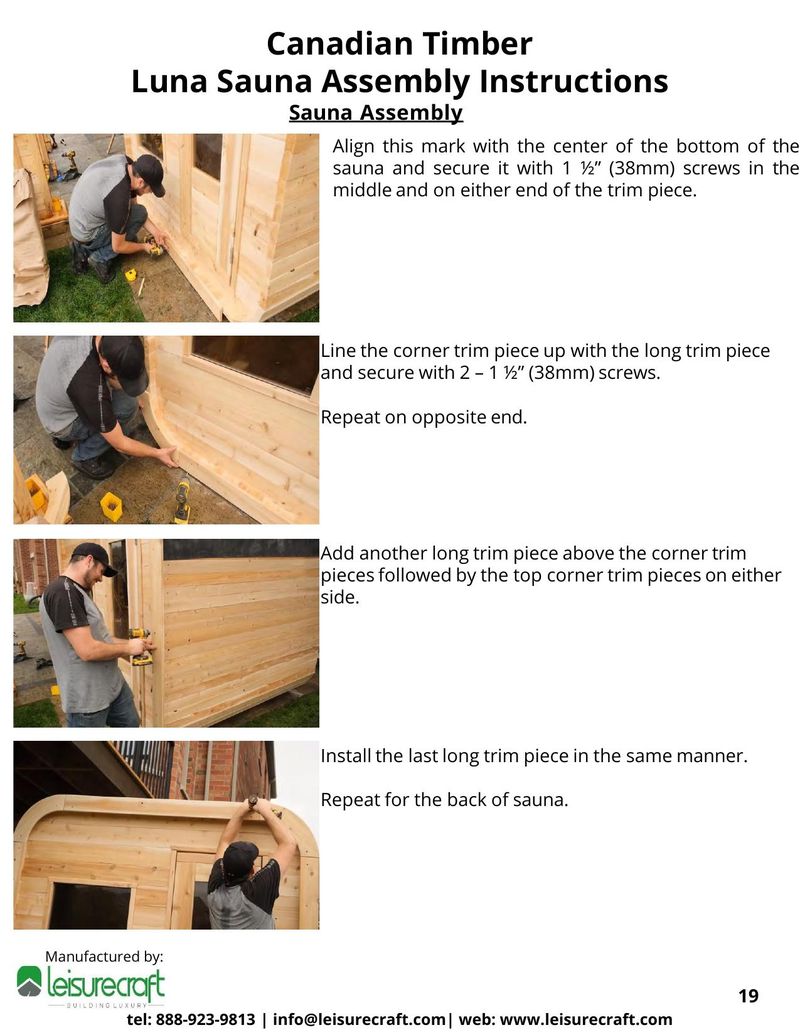
Line the corner trim piece up with the long trim piece and secure with 2 – 1 ½" (38mm) screws.
Repeat on opposite end.
Add another long trim piece above the corner trim pieces followed by the top corner trim pieces on either side.
Install the last long trim piece in the same manner.
Repeat for the back of sauna.
Start your first siding piece at the top of the bottom corner piece. Ensure it is level and secure using staples.
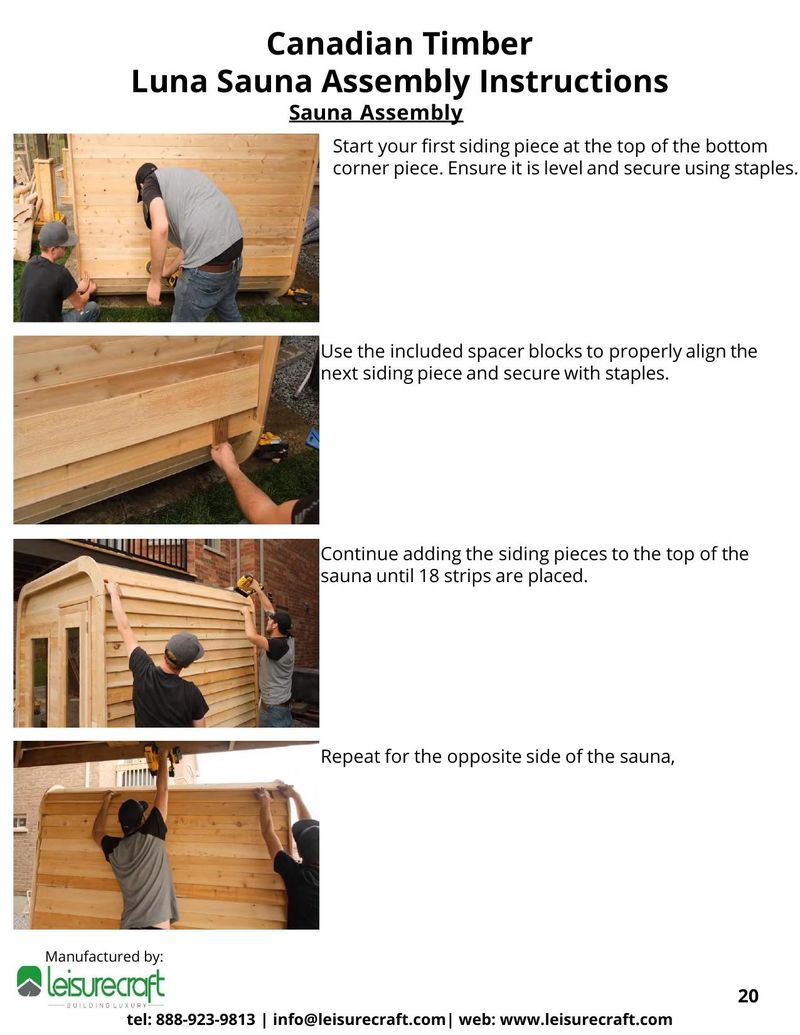
Use the included spacer blocks to properly align the next siding piece and secure with staples.
Continue adding the siding pieces to the top of the sauna until 18 strips are placed.
Repeat for the opposite side of the sauna.
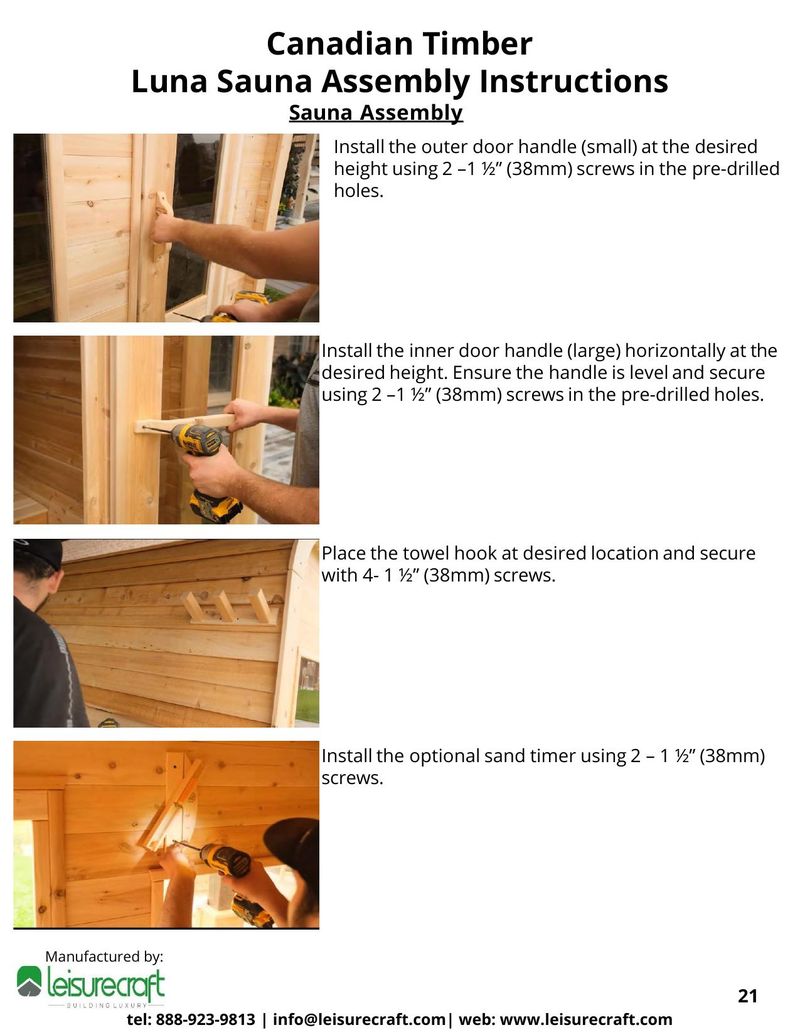
Install the outer door handle (small) at the desired height using 2 –1 ½" (38mm) screws in the pre-drilled holes.
Install the inner door handle (large) horizontally at the desired height. Ensure the handle is level and secure using 2 –1 ½" (38mm) screws in the pre-drilled holes.
Place the towel hook at desired location and secure with 4- 1 ½" (38mm) screws.
Install the optional sand timer using 2 – 1 ½" (38mm) screws.
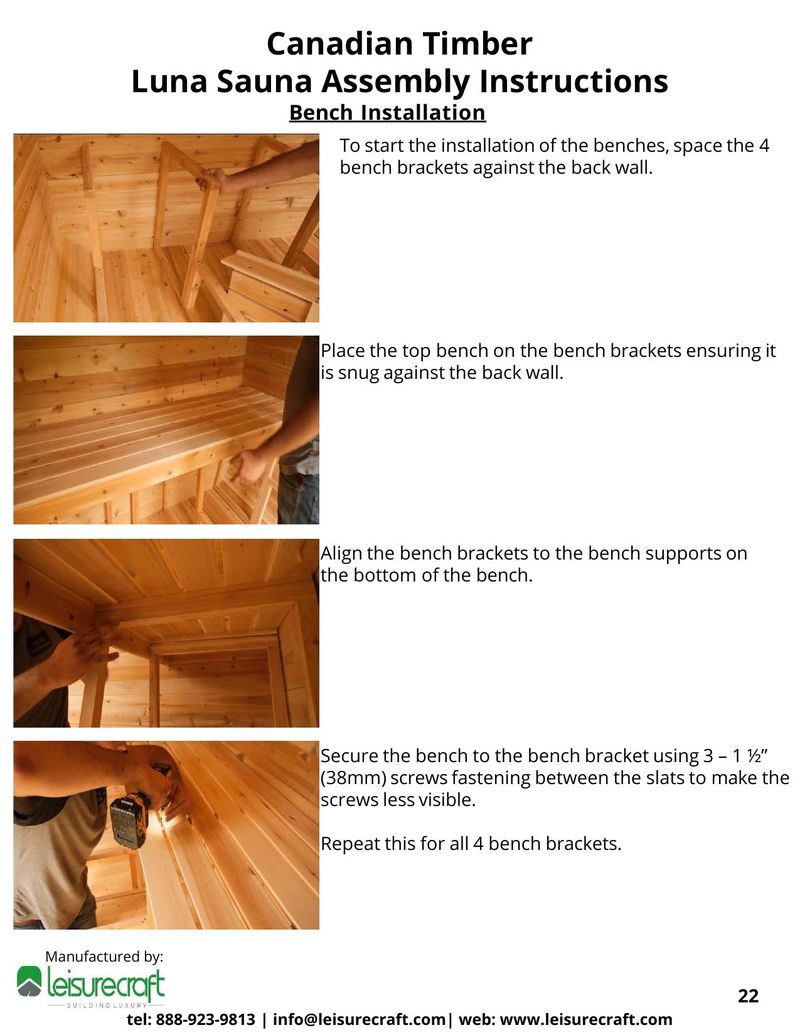
To start the installation of the benches, space the 4 bench brackets against the back wall.
Place the top bench on the bench brackets ensuring it is snug against the back wall.
Align the bench brackets to the bench supports on the bottom of the bench.
Secure the bench to the bench bracket using 3 – 1 ½" (38mm) screws fastening between the slats to make the screws less visible.
Repeat this for all 4 bench brackets.
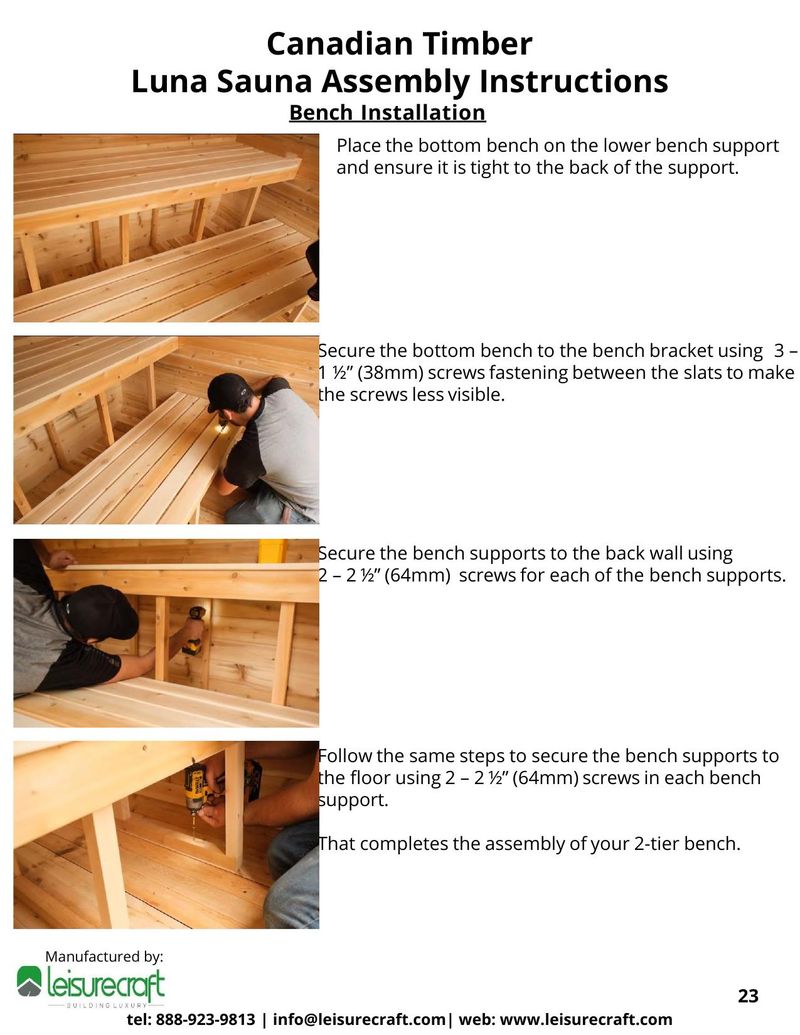
Place the bottom bench on the lower bench support and ensure it is tight to the back of the support.
Secure the bottom bench to the bench bracket using 3 – 1 ½" (38mm) screws fastening between the slats to make the screws less visible.
Secure the bench supports to the back wall using 2 – 2 ½" (64mm) screws for each of the bench supports.
Follow the same steps to secure the bench supports to the floor using 2 – 2 ½" (64mm) screws in each bench support.
That completes the assembly of your 2-tier bench.
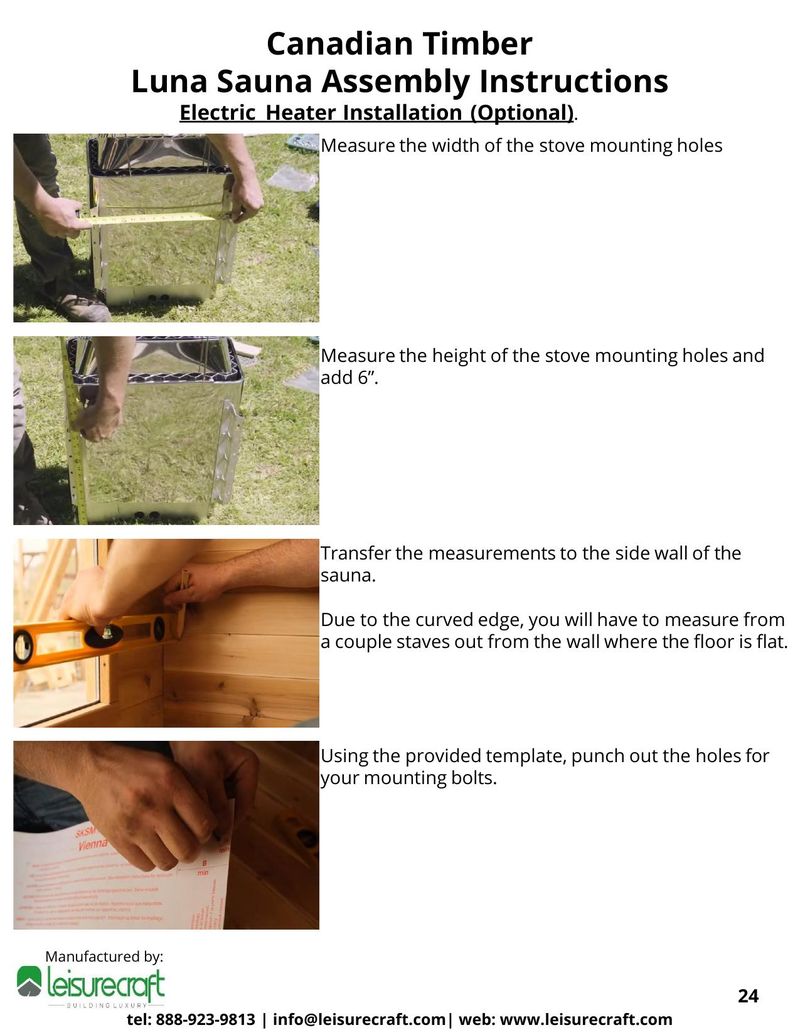
Measure the width of the stove mounting holes
Measure the height of the stove mounting holes and add 6".
Transfer the measurements to the side wall of the sauna.
Due to the curved edge, you will have to measure from a couple staves out from the wall where the floor is flat.
Using the provided template, punch out the holes for your mounting bolts.
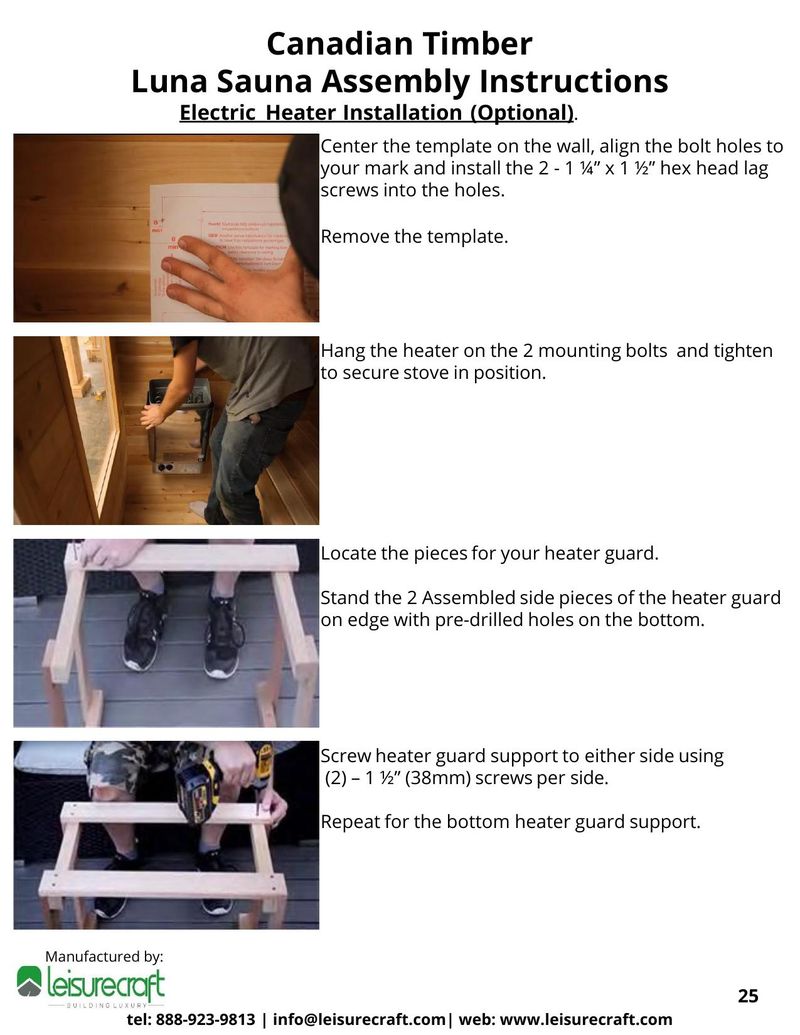
Center the template on the wall, align the bolt holes to your mark and install the 2 - 1 ¼" x 1 ½" hex head lag screws into the holes.
Remove the template.
Hang the heater on the 2 mounting bolts and tighten to secure stove in position.
Locate the pieces for your heater guard.
Stand the 2 Assembled side pieces of the heater guard on edge with pre-drilled holes on the bottom.
Screw heater guard support to either side using (2) – 1 ¼" (38mm) screws per side.
Repeat for the bottom heater guard support.

Place 2- 2 ½" (64mm) screws into the pre-drilled holes on either side of heater guard to prepare for mounting.
Center the guard around the heater and secure to wall with the preplaced screws.
Ensure the guard is level and secure the other side.
Wash the layer of rock dust off of the sauna rocks before using them.
When your sauna is set up and working you should "break-in" the sauna before using it for the first time by turning on the heater to its highest setting and operate it for about 1 hour.
This is recommended to burn off any oils impurities from manufacturing, and it also "cures" the woodwork.
All wiring should be installed according to the heater manufacturers instructions and by a licensed electrician.
Do NOT use a G.F.I breaker
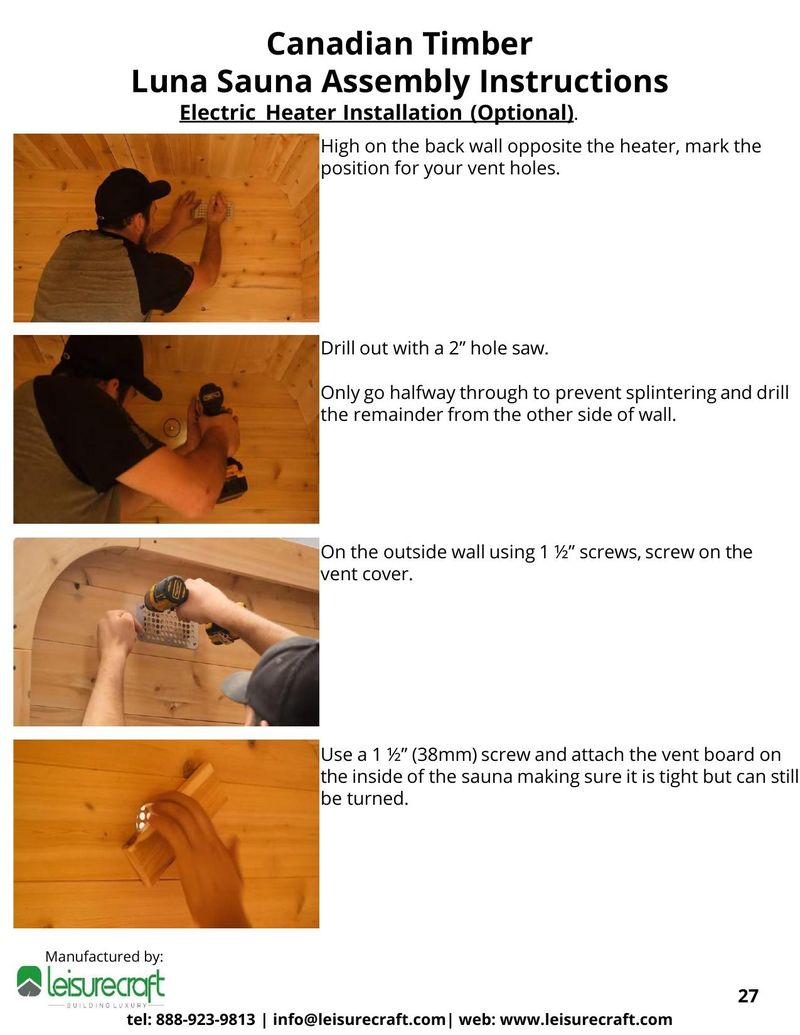
High on the back wall opposite the heater, mark the position for your vent holes.
Drill out with a 2" hole saw.
Only go halfway through to prevent splintering and drill the remainder from the other side of wall.
On the outside wall using 1 ½" screws, screw on the vent cover.
Use a 1 ½" (38mm) screw and attach the vent board on the inside of the sauna making sure it is tight but can still be turned.
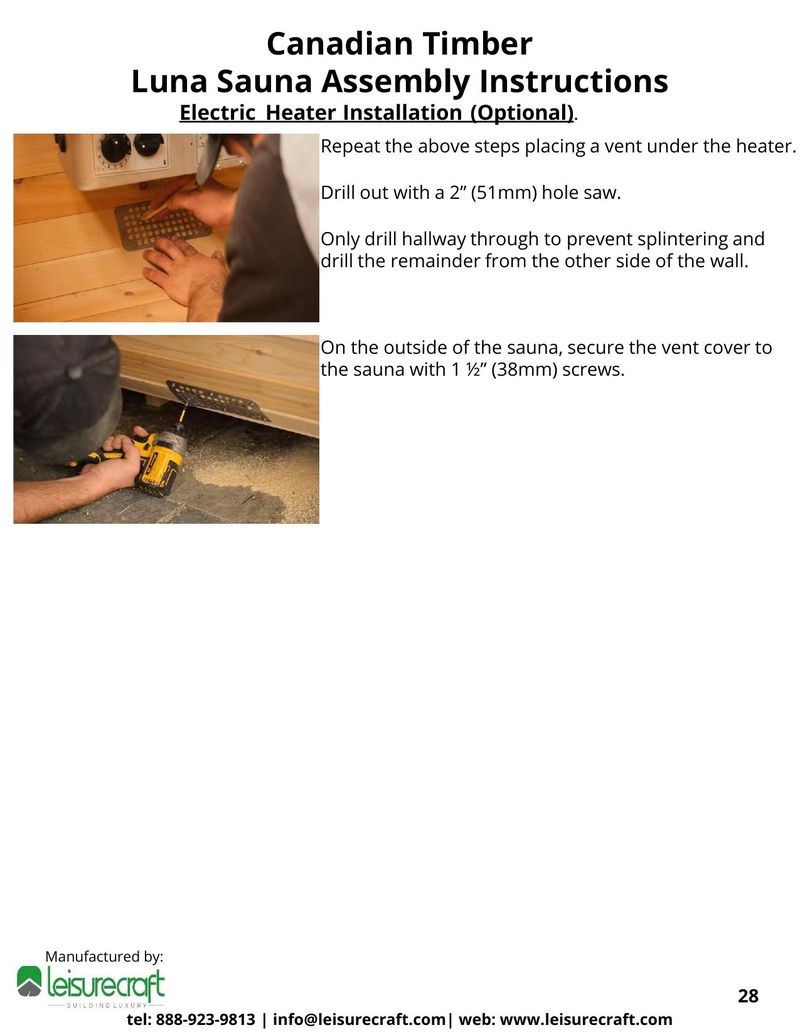
Repeat the above steps placing a vent under the heater.
Drill out with a 2" (51mm) hole saw.
Only drill halfway through to prevent splintering and drill the remainder from the other side of the wall.
On the outside of the sauna, secure the vent cover to the sauna with 1 ½" (38mm) screws.
It is recommended to vacuum or sweep out the inside of your sauna frequently to remove dirt and other debris. Under normal conditions, a slight wash of the floor and benches with warm soapy water several times a year will maintain its cleanliness. Leisurecraft offers a sauna room cleaner that can be used pure or diluted at a 4-1 ratio. Simply spray and wipe!
You can use a sheet of fine grit sandpaper or a low-pressure wash to remove more stubborn stains or for a deeper cleaning of the interior of your sauna.
Never use ammonia or harsh cleaners as they can turn the wood gray.
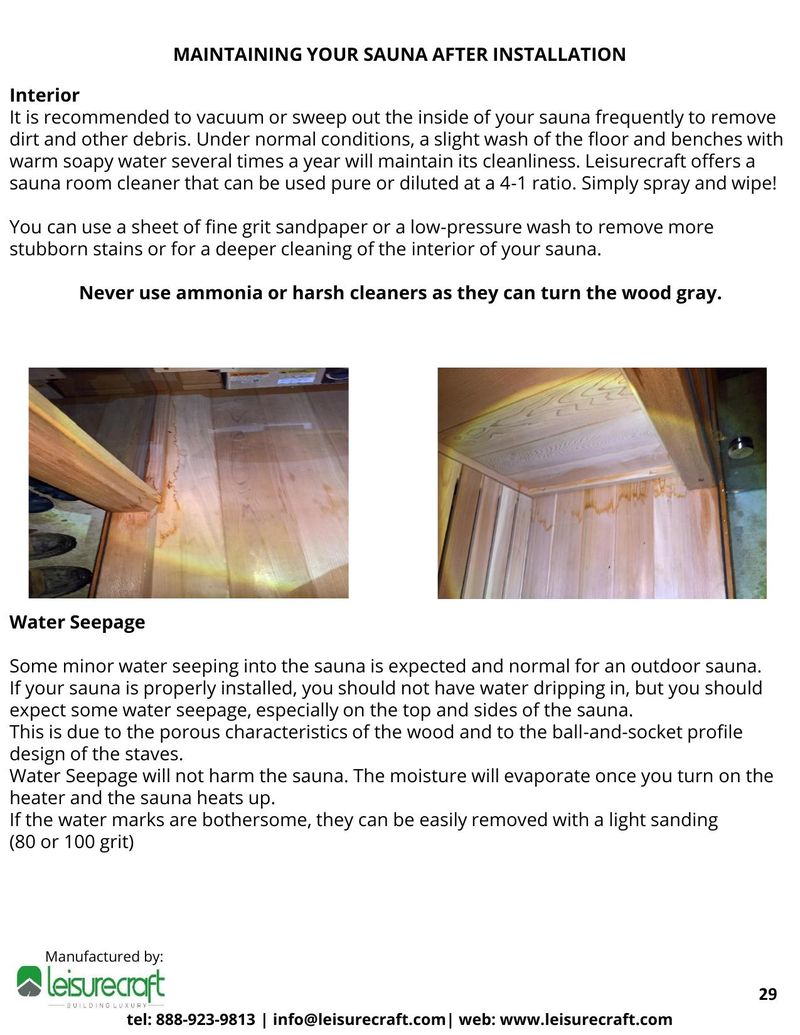
Some minor water seeping into the sauna is expected and normal for an outdoor sauna. If your sauna is properly installed, you should not have water dripping in, but you should expect some water seepage, especially on the top and sides of the sauna.
This is due to the porous characteristics of the wood and to the ball-and-socket profile design of the staves.
Water Seepage will not harm the sauna. The moisture will evaporate once you turn on the heater and the sauna heats up.
If the water marks are bothersome, they can be easily removed with a light sanding (80 or 100 grit)
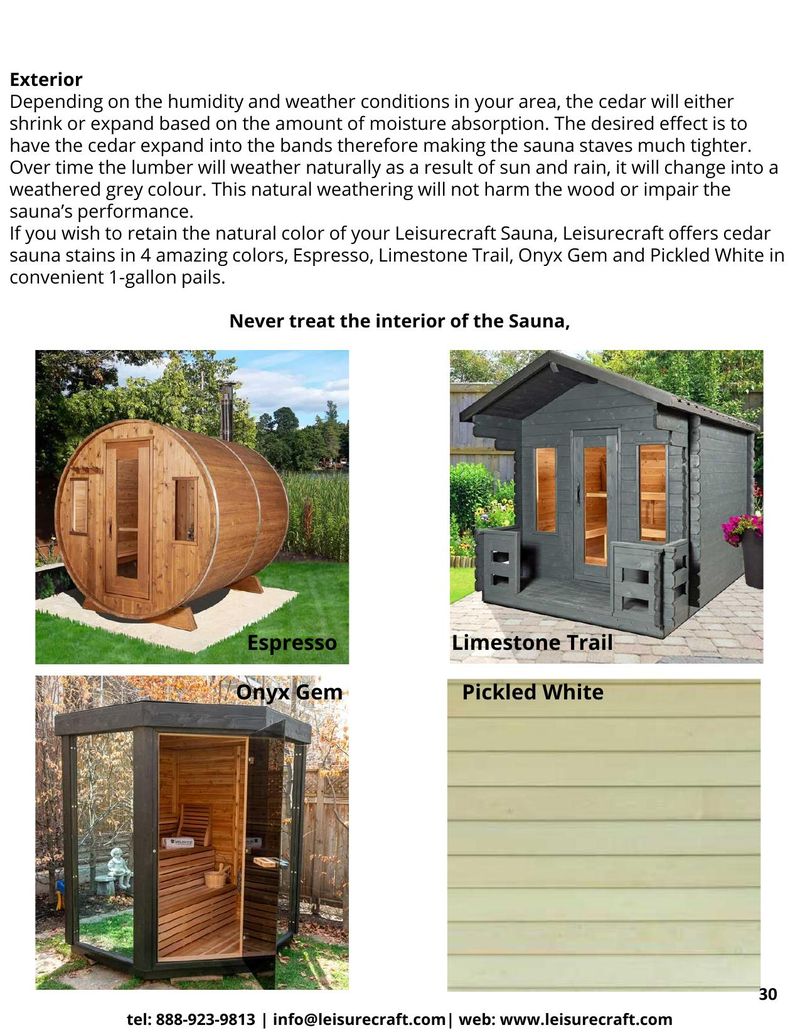
Depending on the humidity and weather conditions in your area, the cedar will either shrink or expand based on the amount of moisture absorption. The desired effect is to have the cedar expand into the bands therefore making the sauna staves much tighter.
Over time the lumber will weather naturally as a result of sun and rain, it will change into a weathered grey colour. This natural weathering will not harm the wood or impair the sauna's performance.
If you wish to retain the natural color of your Leisurecraft Sauna, Leisurecraft offers cedar sauna stains in 4 amazing colors, Espresso, Limestone Trail, Onyx Gem and Pickled White in convenient 1-gallon pails.
Never treat the interior of the Sauna.
All products designed and manufactured by Dundalk LeisureCraft Inc. ("LeisureCraft") are covered by a limited warranty against defects in materials and workmanship under normal residential use for a period of five (5) years, beginning on the date the product is received by the original end-user consumer.
This warranty does not apply to defects resulting from normal wear and tear, improper installation, insufficient or improper maintenance, natural weather conditions or failure to follow the manufacturer's installation, usage, or care instructions.
In the event of a valid warranty claim, LeisureCraft will provide replacement parts at no charge. However, please note that the replacement of parts will not extend the original warranty period.
This warranty is limited solely to the replacement of parts and does not cover any associated service, labor, or installation costs, all of which are expressly excluded.
For products offered by LeisureCraft that are not manufactured by LeisureCraft, please refer to the warranty policy and terms provided by the manufacturer.
Dundalk LeisureCraft Inc. ("LeisureCraft") is committed to providing high-quality sauna heaters and accessories to our customers. To offer peace of mind, we will match the manufacturer's warranty on all eligible products purchased from us. If the manufacturer offers a warranty on the product, we will honor that warranty, ensuring the same terms, coverage, and duration.
This warranty is limited to the replacement of parts only. It does not cover any service, labor, or installation costs, which are expressly excluded.
This warranty does not apply to defects caused by normal wear and tear, improper installation, inadequate or improper maintenance, or failure to adhere to the manufacturer's installation, use, or care instructions.
All electrical connections must be made by a licensed electrician. Failure to comply with this requirement will void the warranty.
For warranty claims or inquiries, please contact LeisureCraft customer support at: Phone: 888-923-9813 Email: [email protected]